De-squeeze anamorphic images with squeezefix
During the last year, the chinese company SIRUI released three anamorphic lenses for various camera mounts. Anamorphic lenses are commonly used in movie production. Instead of rendering a proportional representation of a subject on the camera sensor, these lenses squeeze the image to give a wider horizontal field of view. This results in a cinema style widescreen picture and the typical “movie”‐look. Normally, such lenses are rare, heavy and expensive.
But not only are the SIRUI lenses smaller and lighter than previous anamorphic lenses, they are also way more affordable.
So, a dream come true for amateur cinematographers and also weirdos like me that always wanted a digital version of the film era Hasselblad X Pan. The X Pan has also been able to capture a widescreen image by just using more of a standard 35mm film strip. Unfortunately, camera sensors do have a fixed size. So unless a manufacturer produces a camera with an extra wide sensor, we are limited to standard aspect ratios.
Except, of course, you squeeze the image onto the sensor. Like with an anamorphic lens.
I have been shooting for while now with their 50mm and lately their 24mm lens. Unfortunately, the resulting images are in the normal 3:2 format, as my Fuji X-T10 does not know about anamorphic nature of the attached lens. Which means that I have to convert all these images to the correct aspect ratio by hand.
While doing this, I got bored…
The Script
To make it easier and faster for me to resize the images from my camera shot with the anamorphic lenses to the correct aspect ratio, I wrote a little python script:
https://github.com/GevatterGaul/squeezefix
It will take a folder, go through all the images inside and resize the JPEG and RAF files to the correct aspect ratio. If you require, it will also move the original images to a separate folder. Afterwards, the images can be imported by Lightroom or managed however you want.
To make it work, you have to set the focal length for the lens in camera. The SIRUI lenses have no electronic coupling to the camera body and will not communicate any metadata.
There are installation instructions and a list of required software in the README in the github repository. Oh, and it only works on MacOS for now.
Technical Details
Up to now I always used the Python library pillow to manipulate images. Especially since there is the fork pillow-simd which uses SIMD instructions to speed up several operations by a large margin. But unfortunately the documentation of both projects is quite lacking and there are also some features missing when it comes to the issues highlighted below: resizing, tags and raw images.
ImageMagick on the other hand has a quite extensive documentation and a rich feature set. There is also the ctypes based library wand which brings the functionality of ImageMagick to Python.
Resizing Is Hard…
img = Image(filepath='img.jpg') |
Done, right? No.
As I had to learn, resize is intended to be used in a linear RGB color space. However, images from your camera will use mostly the sRGB or sometimes AdobeRGB color space. These are not linear. In both color spaces, the brightness of a pixel is also affected by gamma correction. sRGB even uses two different curves for this.
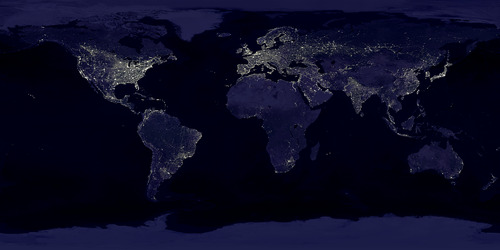
Resizing in one of these color spaces might result in a unintended shift of brightness in the image as demonstrated here by using the NASA image Earth’s City Lights. Taking the example from the ImageMagick documentation, we see the result of resizing without a color space conversion:
convert earth_lights_4800.tif -resize 500 earth_lights_direct.jpg |
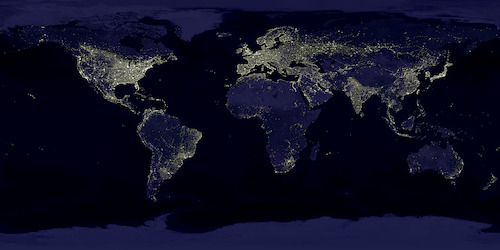
And with a color space conversion:
convert earth_lights_4800.tif -colorspace RGB -resize 500 -colorspace sRGB earth_lights_colorspace.jpg |
If you want to know more about this behaviour, the ImageMagick documentation has an even more detailed explanation along with more guidelines as of how to avoid the issue.
To make the resizing work as inteded in Python for an sRGB image, the code has to look something like this:
img.depth = 16 |
Here, I also increase the bit depth first so there should be less calculation errors during the operation.
To resize an image that uses the AdobeRGB color space we only have to reset the gamma correction before the resize operation as AdobeRGB uses only one correction instead of two as sRGB:
img.depth = 16 |
You can find the value of the AdobeRGB gamma in the AdobeRGB Spec. 0.4547069271758437 is the inverse value.
Fun Fact: Even Photoshop will not correctly resize if you do not convert the color space before and after.
Tags Are Harder
But we are not done yet. The resized image will still contain all metadata information pointing to the old aspect ratio as well as preview images which are also in the old aspect ratio.
Metadata
Accessing and changing image metadata in Python is tedious. There are several ways to do it, but none of them gives you all capabilities or access to everything. Additionally, every library and tool uses its own slightly different naming scheme for the tags. The image width, for instance, is called Exif Image Width in the exiftool output, but ExifImageWidth internally. wand, however, iterprets it as exif:XResolution and piexif as key 40962 with a translation to PixelXDimension. To set it, you have to use piexif.ExifIFD.PixelXDimension.
To save you more of the rant: I settled for the wand metadata object for most cases and piexif for special cases and writing metadata. Here are some examples of how I did it, but you also can look it up in the github repository.
Reading the focal length:
img.metadata['exif:FocalLength']) |
Checking for an AdobeRGB color space. This needs information from two different tags:
if 'exif:ColorSpace' in img.metadata and img.metadata['exif:ColorSpace'] == '65535': |
Set new image width and height:
exif_bytes = img.profiles['exif'] |
Preview Images
The original files will contain preview images in several sizes and formats. Especially noteworthy is the FinePix tag format in Fuji JPEGs which is based on a MS DOS floppy disk file system and cannot be written even with exiftool.
The Fuji JPEGS contain 2 preview images: The ThumbnailImage and the FinePix Preview. Converted raw (DNG) files contain the Preview, the Thumbnail TIFF and a JpegFromRaw. In addition to the JPEG FinePix Preview, I am also unable to set the DNG Thumbnail TIFF.
For the other preview images I use exiftool. The operation is basically always the same and only differs in the name of the preview tag.
exiftool -overwrite_original_in_place "-ThumbnailImage<=thumb.jpg" img.jpg |
Creating Anamorphic RAWs
Naturaly, we cannot just resize Fuji RAF files to the desqueezed aspect ratio. But there is a neat trick: DNG files have a special exif tag where you can specify a correction factor for the aspect ratio. You can set it with exiftool like this:
exiftool -overwrite_original_in_place -DefaultScale="1.33 1" img.dng |
So squeezefix will convert the Fuji RAF files to DNG using the Adobe Digital Negative Converter and then set the correction factor. The resulting DNG files will be shown in the correct aspect ratio in Lightroom and Photoshop.
Future Work
Currently the tool works for my needs. But there is still a lot to be done to make it suitable for a wider audience: Making it run on windows would be an important step. I also will test it on other cameras over time. At the moment I only have a Fuji X-T10 available.
The code itself also needs some work. To make it work as soon as possible, I omitted all code quality measures like linting, typechecks or tests. I will get to that once I have some free time on my hands again.
If you want to contribute, then create pull requests on github containing your proposed changes. Or send me RAW and JPEG files shot with SIRUI lenses on you camera so I can incorporate the format into the tool.
For now, I hope the tool is of some use to you.