Azure VM Deployment With Ansible
Lately, I wanted to try some web service that would scale to multiple machines so putting them in the cloud seemed to be a good idea.
But before scaling a set of machines, I need a single VM that can do some monitoring and also serve as a jumphost to reach the scale set. I turned the resulting Ansible script into this howto for deploying VMs on Azure with Ansible.
For tasks like that, everyone else is using AWS and Terraform, so I thought: too mainstream. Instead, I went with Azure and Ansible.
Prerequisites
The Ansible script should work on every platform that has a recent Python installation. For me, that’s MacOS and Python 3.10.
Setting up an Azure service principal
To access Azure I use a service principal. To get one you have to register an “app” in Azure that will serve as a proxy for your Ansible script. You also have to give an appropriate role to the app. I used a Contributor role on my subscription. There is a detailed description on how to set up a service principal in the Microsoft docs. I chose application secret as login method.
After completing the guide you will have the following credentials: client id, subscription id, tenant id and secret. You can then either put them in a configuration file like this:
[default] |
Or you export them as environment variables. I use the latter method because I can then reuse the variables in packer scripts.
export AZURE_CLIENT_ID=xxxxxxx-xxxx-xxxx-xxxx-xxxxxxxxxxxx |
Azure Python Packages
Installing python packages works a bit different this time because the PIP packages are outdated as is the Ansible documentation. Instead, there is a special Ansible Galaxy repository which provides all dependencies:
mkvirtualenv azure-demo |
Ansible Galaxy is included in my default Python installation. I presume it’s the same for you.
Ansible Hosts for Azure Deployments
Normally Ansible tasks are executed on remote hosts. But when creating the cloud infrastructure, there are no hosts to execute the scripts on. You can then either execute on a host that serves as a proxy, maybe because it has access to the cloud and you don’t, or execute the tasks locally as I do.
We have to tell Ansible where to find the python environment, though:
|
You should adjust the path to your virtualenv.
Testing the Setup
After completing all the previous steps, the following command should work.
ansible -m azure_rm_resourcegroup_info -c local localhost |
(Optional) Azure CLI
The Azure CLI offers complete control over your Azure resources but without the comfort of Ansible scripts. However, it can be handy at times so think about installing it, too. There are installation instructions for several systems.
The Azure CLI has several login mechanisms, but you can just:
az login |
It will open your browser for login.
Azure Setup
Before we create the actual Azure VM, we have to create several other resources.
Resource Group
First is a resource group which holds all further resources. As far is I know every resource in Azure must be associated with a resource group. The start of our Ansible playbook therefore looks like this:
# This is the start of the script. All following snippets are indented 2 spaces so you can concatenate them |
As mentioned previously, we use a local connection to our machine to execute the structural tasks. We don’t need information about our machine, so we disable fact gathering to save some execution time.
As you can see we start the playbook like normally but then use subtasks to do the actual work.
I chose the Azure location North Central US because the VMs I need for my projects are cheap there. If you want a better ping, choose a location near you.
Security Group
The security group works like a mini-firewall. You can define simple rules for what goes in and out. The rules will be evaluated in order of priority - lowest priority first.
We need the security group to allow SSH, HTTP and HTTPS traffic to our VM.
# 2 spaces if indent, so you can concatenate |
Azure will append some default rules to ours so that we don’t have to worry about a drop all rule or something like that. The result will look like this:
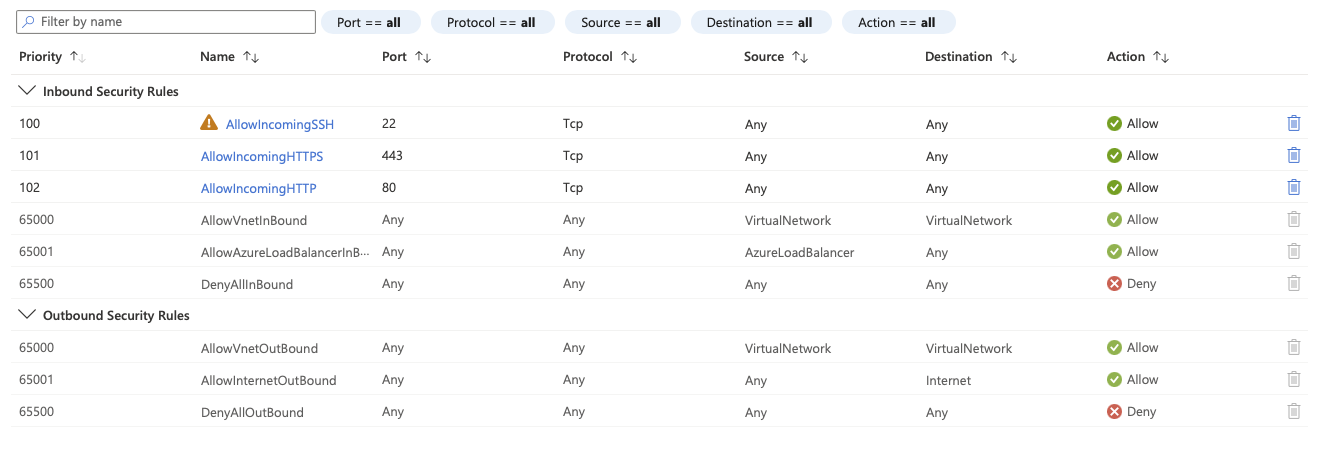
The greyed out lines you can’t delete are the default ones.
Virtual Network and Subnet
A firewall makes no sense without a network, so let’s create one:
- name: Ensure virtual network |
Azure requires you to create a subnet for the VMs. You cannot just use the virtual network itself.
You are free to choose any network prefix from the ones reserved for local networks. I restricted my subnet to a /24 network so I will be able to create more later. That could be a problem if you plan to deploy more than 254 instances in that subnet, so watch out for that.
Public IP Address and Interface
To be able to reach the VM from the internet it has to have a public IP address. That’s easy to get in Azure. Just state a domain name that will then be prepended to the domain of your Azure location. In our case it would be azuredemojumphost.northcentralus.cloudapp.azure.com. It may be a good idea to pick a name for your own.
The Azure domain name is good for quick testing or when you don’t need to make you service public. But if you want to build a brand, you will use your own domain through either the Azure DNS services or your own domain service.
- name: Create a public ip address |
We then create a network interface that uses the new public IP and domain name. It also uses our security group so we can access the VM later via SSH and HTTP/S.
- name: Ensure jumphost interface |
Virtual Machine
Now we can actually create our virtual machine. I will later use a ssh key to log in so I specify its public key in the ssh_public_keys list. The ssh key has to be RSA with a minimum length of 3072 bit.
- name: Ensure jumphost |
I use a smaller general purpose VM size for this example. Of course you can adjust to your needs.
Ok, done! Let’s execute the playbook:
ansible-playbook azure-demo.yml |
When the script is finished you should be able to connect to the new VM via SSH like this:
ssh -i ~/.ssh/your_private_key azureadmin@azuredemojumphost.northcentralus.cloudapp.azure.com |
FAQ
Where do I get the Azure machine size strings?
In typical Microsoft fashion, the machine sizes are named differently everywhere. However, sing the Azure CLI you can get usable VM size strings for your location:
az vm list-sizes --location northcentralus |
Where do I get the Azure OS image strings?
You can query Azure with the Azure CLI to get the image offer name, sku and version that you need:
# List all images from canonical |