Mining Monero On Azure
Privacy coins rallied in the last days in light of the current geopolitical events. So is it the perfect time to finally start mining? And how do we do it? We already saw that mining Monero on Raspberry Pis makes no sense. And we surely don’t want to buy a whole server farm, do we?
So how about mining in the cloud? After all, Monero prices are rising, so it should be profitable, right?
Spoiler: No, it isn’t. But if you want to know how to set up Monero mining on Azure with Packer and Ansible and see the gathered data, keep on reading.
A simple mining setup on Azure
In mining Monero on Raspberry Pis we learned that we would need a lot of processing power to get rewarded with some XMR. Azure allows for starting a lot of VMs in parallel by using a scale set. We just have to provide an image that will start our miner. To build that image we will use the tool Packer. And as always, we will use Ansible to control the scale set.
I assume that you already have a working Azure dev setup and a virtual network where we can run the scale set. Otherwise, check out my post about deploying VMs on Azure and follow the basic steps including the virtual network and subnet.
How to set up the miner image with Packer
Packer makes it easy to create preconfigured images for different platforms like Azure, AWS or Docker. It works by starting a VM or container on the chosen platform, executing your scripts and saving the result as an image. To make this work for us, you have to set up you Azure dev environment including the credentials in environment variables.
Our script will create a minimal image that just installs and enables xmrig as a service. You can add other functionality, of course. I will split the scripts in four parts to be able to explain them better. You can concatenate them to make it work.
The first section takes over the azure credentials from our environment variables. The env function is relatively new, but finally we can get rid of the PKR_VAR prefixes for the environment variables.
variable "azure_client_id" { |
Then we tell Packer to load the Azure plugin which we will use later to build the image.
packer { |
Now for the image: we set our Azure credentials, select a base image and the region we want to work on. The image has to end up in the region we want to set up our scale set so we can then reference it.
source "azure-arm" "xmrig" { |
Now we need to install xmrig. In Packer we can do install tasks using provisioners. We will use two kinds: the file provisioner to copy the systemd unit file to the image and the shell provisioner to install xmrig.
One could use a xmrig apt package, but there is none in the official repositories. So I chose to compile xmrig myself.
build { |
We start xmrig as a systemd service at boot. The file has two workarounds for problems that occured in my tests:
There, xmrig did not recognize the number of cores of the VM and only used one thread to mine. I don’t know if that’s a xmrig or Azure issue, but of course we want our VM to mine as fast as it can. So we start xmrig in another shell where we can evaluate nproc and pass the correct number of threads to xmrig.
Also, we don’t use a config file. Mixing settings from the config file with the threads parameter made xmrig ignore some settings in my tests. So I ditched the config file.
[Unit] |
Start/Stop the Azure scale set
The scale set only needs one Ansible command to start and stop. Again, you need to set up your Azure dev setup and a vnet with subnet beforehand.
To be able to log in on the VMs and maybe do some debugging, we pass a ssh public key. It would be a good idea to use a different one than for the jumphost so you don’t compromise your jumphost key if you want to copy the scale set key to the jumphost.
If you want to use the jumphost, check my post on deploying VMs on Azure.
|
To stop the mining, we just delete the scale set:
|
Results
The following table shows the VM sizes I used for testing and what hashrate they generated. The hashrate is more like a ballpark figure as the VM performance was inconsistent during my tests.
| VM Size | Region | CPU | Cores | RAM | H/s | Price/$ | Spot-Price/$ |
|---|---|---|---|---|---|---|---|
| F2s v2 | West Europe | Intel(R) Xeon(R) Platinum 8272CL CPU | 2 | 4 | 800 | 0,097 | 0,0148 |
| F4s v2 | West Europe | Intel(R) Xeon(R) Platinum 8272CL CPU | 4 | 8 | 1600 | 0,194 | 0,0295 |
| F8s v2 | West Europe | Intel(R) Xeon(R) Platinum 8272CL CPU | 8 | 16 | 2958 | 0,388 | 0,059 |
| F16s v2 | West Europe | Intel(R) Xeon(R) Platinum 8272CL CPU | 16 | 32 | 6143 | 0,776 | 0,1179 |
| F32s v2 | West Europe | Intel(R) Xeon(R) Platinum 8272CL CPU | 32 | 64 | 8442 | 1,552 | 0,2358 |
| F48s v2 | West Europe | Intel(R) Xeon(R) Platinum 8272CL CPU | 48 | 96 | 9064 | 2,328 | 0,3537 |
| F64s v2 | West Europe | Intel(R) Xeon(R) Platinum 8272CL CPU | 64 | 128 | 11367 | 3,104 | 0,4715 |
| F72s v2 | West Europe | Intel(R) Xeon(R) Platinum 8272CL CPU | 72 | 144 | 10630 | 3,492 | 0,5305 |
| D2as v4 | North Central US | AMD EPYC 7452 32-Core Processor | 2 | 8 | 903 | 0,096 | 0,013 |
| D4as v4 | North Central US | AMD EPYC 7452 32-Core Processor | 4 | 16 | 1818,3 | 0,192 | 0,0259 |
| D8as v4 | North Central US | AMD EPYC 7452 32-Core Processor | 8 | 16 | 3366,8 | 0,384 | 0,0517 |
| D16as v4 | North Central US | AMD EPYC 7452 32-Core Processor | 16 | 64 | 6747,6 | 0,768 | 0,1033 |
| D32as v4 | North Central US | AMD EPYC 7452 32-Core Processor | 32 | 128 | 9674 | 1,536 | 0,2065 |
| D48as v4 | North Central US | AMD EPYC 7452 32-Core Processor | 48 | 192 | 11855 | 2,304 | 0,3097 |
| D64as v4 | North Central US | AMD EPYC 7452 32-Core Processor | 64 | 256 | 13759 | 3,072 | 0,4129 |
Is Monero Mining on Azure profitable?
No. At least not at the current XMR price of $193 and the network hashrate of 2.7GH/s. The following table shows how much money you will currently loose when mining Monero with our setup.
The table includes normal earnings and spot price earnings, assuming that you would mine only at spot price.
| VM Size | Cost/Day | Spot Cost/Day | Earnings | Net Earnings/Day | Spot Net Earnings/Day |
|---|---|---|---|---|---|
| D2as v4 | $2,30 | $0,31 | $0,03 | -$2,27 | -$0,28 |
| F2s v2 | $2,33 | $0,36 | $0,03 | -$2,30 | -$0,33 |
| D4as v4 | $4,61 | $0,62 | $0,06 | -$4,54 | -$0,56 |
| F4s v2 | $4,66 | $0,71 | $0,06 | -$4,60 | -$0,65 |
| D8as v4 | $9,22 | $1,24 | $0,12 | -$9,10 | -$1,12 |
| F8s v2 | $9,31 | $1,42 | $0,10 | -$9,21 | -$1,31 |
| D16as v4 | $18,43 | $2,48 | $0,23 | -$18,20 | -$2,24 |
| F16s v2 | $18,62 | $2,83 | $0,21 | -$18,41 | -$2,62 |
| D32as v4 | $36,86 | $4,96 | $0,34 | -$36,53 | -$4,62 |
| F32s v2 | $37,25 | $5,66 | $0,29 | -$36,95 | -$5,37 |
| D48as v4 | $55,30 | $7,43 | $0,41 | -$54,88 | -$7,02 |
| F48s v2 | $55,87 | $8,49 | $0,32 | -$55,56 | -$8,17 |
| D64as v4 | $73,73 | $9,91 | $0,48 | -$73,25 | -$9,43 |
| F64s v2 | $74,50 | $11,32 | $0,40 | -$74,10 | -$10,92 |
| F72s v2 | $83,81 | $12,73 | $0,37 | -$83,44 | -$12,36 |
xmrig performance on Azure VMs
xmrig does not scale well on Azure VMs. From 8 cores on, the hashrate per core drops. I can’t tell wether that’s a xmrig or Azure issue. If I would continue to mine on Azure, I just would use smaller VM sizes.
The following chart shows the drop in hashrate of xmrig on Fs and Das series VMs on Azure.

Inconsistent VMs
But xmrig scalability is not the only issue. During my tests I repeatedly came across underperforming VMs. I did a small test with up to 20 VMs:
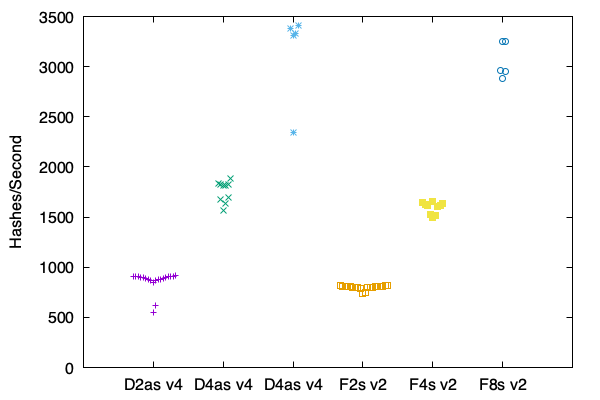
Azure limits the amount of cores you can use on VMs of a specific size. I did not get enough cores approved to make a proper statistic on the performance issue.
Also, VMs of the same size might have different CPUs in different regions. My Fs VMs had Xeon Platinum 8168 from the Skylake generation in North Central US and Xeon Platinum 8276CL of the Cascade Lake generation in West Europe.
In the end, I just used what I could get.
How about mining at spot prices?
Yes, this howto doesn’t include a section on how to mine at spot prices. But that’s probably a topic for another post.